Introduction
Animation in WPF has been made easier because WPF achieves animation by modifying properties of elements, whereas in Windows Forms, a developer has to create a timer and modify the appearance of elements on the tick event of a timer. WPF uses its own timing system which can be written using managed code and XAML. The internal work of redrawing the screen is handled efficiently by WPF. While animating using WPF, you just need to focus on the effects you want to create without bothering about how to achieve those effects.
To demonstrate this, I have created a Waving Flag animation which uses a series of images displayed in a sequence.
Background
DoubleAnimation
WPF achieves animation by animating element properties. For example, if you want to produce a zoom in or zoom out effect for a rectangle, you can animate the width and height properties. The following code animates a rectangle by modifying its width and height properties.
 Collapse | Copy Code
<Rectangle Name="myrect" Width="1" Height="1">
    <Rectangle.Fill>
        <SolidColorBrush Color="Red"/>
    </Rectangle.Fill>
    <Rectangle.Triggers>
        <EventTrigger RoutedEvent="Window.Loaded">
            <BeginStoryboard>
                <Storyboard RepeatBehavior="Forever">
                    <DoubleAnimation Storyboard.TargetName="myrect"
                       Storyboard.TargetProperty="Width" From="1" To="350"
                       Duration="0:0:1" BeginTime="0:0:0"/>
                    <DoubleAnimation Storyboard.TargetName="myrect"
                       Storyboard.TargetProperty="Height" From="1" To="250"
                       Duration="0:0:1" BeginTime="0:0:1"/>
                    <DoubleAnimation Storyboard.TargetName="myrect"
                       Storyboard.TargetProperty="Height" From="250"
                       To="1" Duration="0:0:1" BeginTime="0:0:2"/>
                    <DoubleAnimation Storyboard.TargetName="myrect"
                       Storyboard.TargetProperty="Width" From="350" To="1"
                       Duration="0:0:1" BeginTime="0:0:3"/>
                </Storyboard>
            </BeginStoryboard>
        </EventTrigger>
    </Rectangle.Triggers></Rectangle>
This code triggers the animation automatically when the window is loaded. The code adds an
EventTrigger to the rectangle. The
BeginStoryboard action runs a storyboard. This storyboard uses four
DoubleAnimations. The first
DoubleAnimation increases the width of the rectangle from 1 to 350. The second one increases the height from 1 to 250. The third and fourth do the reverse by decreasing the height and width back to 1. The four
DoubleAnimations are made to run in a sequence by setting the
BeginTime attribute such that each animation starts when the previous is over. The
RepeatBehavior attribute of the Storyboard is assigned the value "
Forever" which makes the animation run indefinitely.
Following is the output of the above code:

Controlling the Animation from Code-Behind
The animation can be controlled from the code-behind by creating a storyboard as a window resource and locating it in code by using the
TryFindResource method as follows:
 Collapse | Copy Code
Storyboard s = (Storyboard)TryFindResource("sb");
Following is the code to create the Storyboard resource:
 Collapse | Copy Code
<Window.Resources>
    <Storyboard x:Key="sb" RepeatBehavior="Forever">
        <DoubleAnimation Storyboard.TargetName="myrect"
          Storyboard.TargetProperty="Width" From="1" To="350"
          Duration="0:0:1" BeginTime="0:0:0"/>
        <DoubleAnimation Storyboard.TargetName="myrect"
          Storyboard.TargetProperty="Height" From="1" To="250"
          Duration="0:0:1" BeginTime="0:0:1"/>
        <DoubleAnimation Storyboard.TargetName="myrect"
          Storyboard.TargetProperty="Height" From="250" To="1"
          Duration="0:0:1" BeginTime="0:0:2"/>
        <DoubleAnimation Storyboard.TargetName="myrect"
          Storyboard.TargetProperty="Width" From="350" To="1"
          Duration="0:0:1" BeginTime="0:0:3"/>
    </Storyboard></Window.Resources>
The following is the code to control the animation programmatically:
 Collapse | Copy Code
public partial class MainWindow : Window
{
public MainWindow()
{
InitializeComponent();
}
private void btnStart_Click(object sender, RoutedEventArgs e)
{
Storyboard s = (Storyboard)TryFindResource("sb");
s.Begin(); }
private void btnStop_Click(object sender, RoutedEventArgs e)
{
Storyboard s = (Storyboard)TryFindResource("sb");
s.Stop(); }
private void btnPause_Click(object sender, RoutedEventArgs e)
{
Storyboard s = (Storyboard)TryFindResource("sb");
s.Pause(); }
private void btnResume_Click(object sender, RoutedEventArgs e)
{
Storyboard s = (Storyboard)TryFindResource("sb");
s.Resume(); }
}
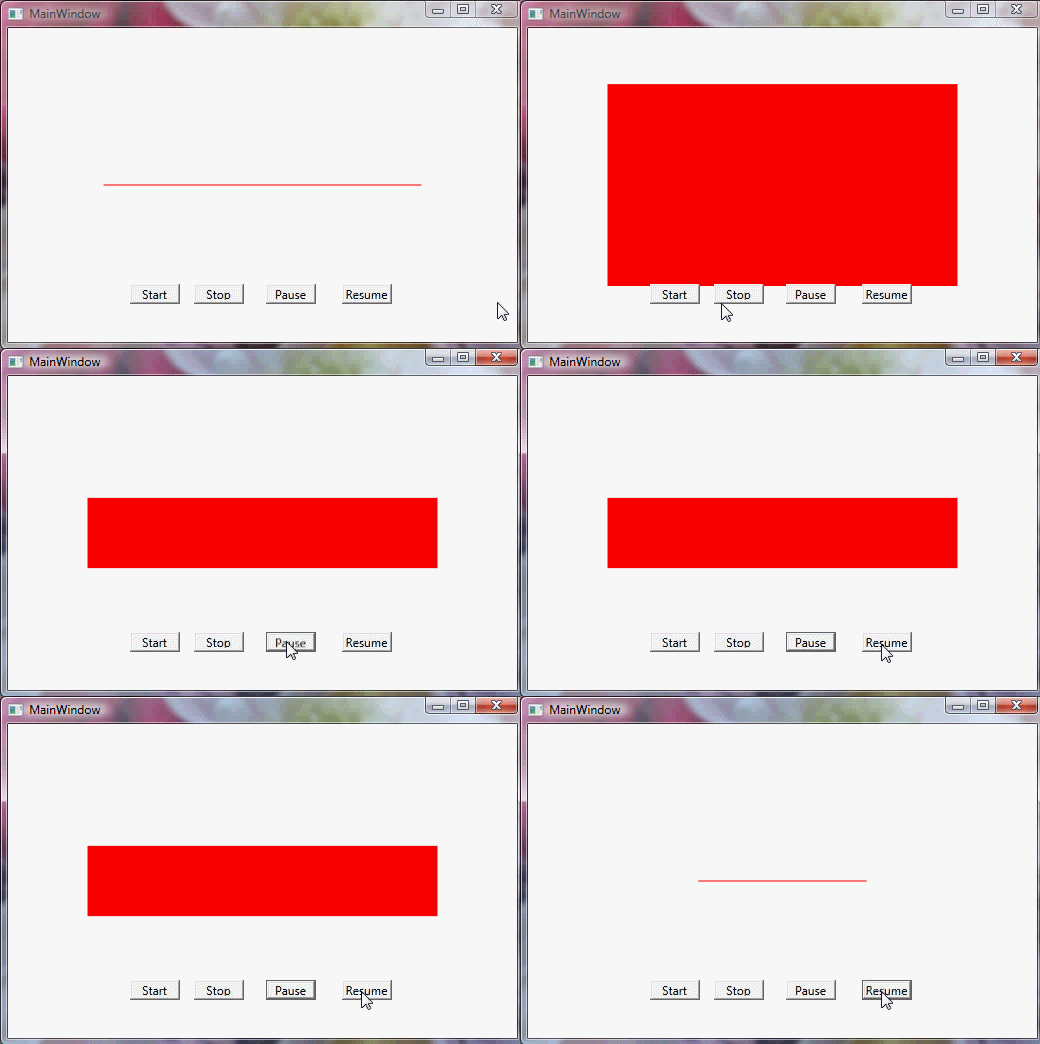
Following is the output of the above code:

Fade In and Fade Out Animation Using DoubleAnimation
Fade In and Fade Out Animation effects can be created using the
Opacity property as follows:
 Collapse | Copy Code
<Rectangle Name="myrect" Width="350" Height="250">
    <Rectangle.Fill>
        <SolidColorBrush x:Name="brush" Color="Red"/>
    </Rectangle.Fill>
    <Rectangle.Triggers>
        <EventTrigger RoutedEvent="Window.Loaded">
            <BeginStoryboard>
                <Storyboard>
                    <DoubleAnimation Storyboard.TargetName="myrect"
                        Storyboard.TargetProperty="Opacity" From="0" To="1"
                        Duration="0:0:1" BeginTime="0:0:0" AutoReverse="True"
                        RepeatBehavior="Forever"/>
                </Storyboard>
            </BeginStoryboard>
        </EventTrigger>
    </Rectangle.Triggers></Rectangle>
The above code changes the opacity of the rectangle from 0 (completely transparent) to 1 (completely opaque).
The output of the above code is as follows:

ColorAnimation
We can use
ColorAnimation to animate the
Color property of a rectangle. Following is the code to produce color animation:
 Collapse | Copy Code
<Rectangle Name="myrect" Width="350" Height="250">
    <Rectangle.Fill>
        <SolidColorBrush x:Name="brush" Color="Red"/>
    </Rectangle.Fill>
    <Rectangle.Triggers>
        <EventTrigger RoutedEvent="Window.Loaded">
            <BeginStoryboard>
                <Storyboard RepeatBehavior="Forever">
                    <ColorAnimation Storyboard.TargetName="brush"
                      Storyboard.TargetProperty="Color" From="Red" To="Green"
                      Duration="0:0:1" BeginTime="0:0:0"/>
                    <ColorAnimation Storyboard.TargetName="brush"
                      Storyboard.TargetProperty="Color" From="Green" To="Blue"
                      Duration="0:0:1" BeginTime="0:0:1"/>
                    <ColorAnimation Storyboard.TargetName="brush"
                      Storyboard.TargetProperty="Color" From="Blue" To="Yellow"
                      Duration="0:0:1" BeginTime="0:0:2"/>
                    <ColorAnimation Storyboard.TargetName="brush"
                      Storyboard.TargetProperty="Color" From="Yellow"
                      To="Red" Duration="0:0:1" BeginTime="0:0:3"/>
                </Storyboard>
            </BeginStoryboard>
        </EventTrigger>
    </Rectangle.Triggers></Rectangle>
This code uses four
ColorAnimations to change the color of the rectangle. The timing of the color change is controlled by using the
BeginTime property.
The above code produces the following output:

Animating Gradient Using ColorAnimation
ColorAnimation can also be used to create gradient animation. The following code can be used for this:
 Collapse | Copy Code
<Rectangle Name="myrect" Width="350" Height="250">
    <Rectangle.Fill>
        <LinearGradientBrush x:Name="brush" StartPoint="0,0" EndPoint="1,1">
            <GradientStop x:Name="stop1" Offset="0" Color="Red"/>
            <GradientStop x:Name="stop2" Offset="0.5" Color="Green"/>
            <GradientStop x:Name="stop3" Offset="1" Color="Blue"/>
        </LinearGradientBrush>
    </Rectangle.Fill>
    <Rectangle.Triggers>
        <EventTrigger RoutedEvent="Window.Loaded">
            <BeginStoryboard>
                <Storyboard RepeatBehavior="Forever">
                    <ColorAnimation Storyboard.TargetName="stop1" Storyboard.TargetProperty="Color"
                       From="Red" To="Green" Duration="0:0:1" BeginTime="0:0:0"/>
                    <ColorAnimation Storyboard.TargetName="stop1" Storyboard.TargetProperty="Color"
                       From="Green" To="Blue" Duration="0:0:1" BeginTime="0:0:0.5"/>
                    <ColorAnimation Storyboard.TargetName="stop1" Storyboard.TargetProperty="Color"
                       From="Blue" To="Red" Duration="0:0:1" BeginTime="0:0:1"/>
                    <ColorAnimation Storyboard.TargetName="stop2" Storyboard.TargetProperty="Color"
                       From="Green" To="Blue" Duration="0:0:1" BeginTime="0:0:0"/>
                    <ColorAnimation Storyboard.TargetName="stop2" Storyboard.TargetProperty="Color"
                       From="Blue" To="Red" Duration="0:0:1" BeginTime="0:0:0.5"/>
                    <ColorAnimation Storyboard.TargetName="stop2" Storyboard.TargetProperty="Color"
                       From="Red" To="Green" Duration="0:0:1" BeginTime="0:0:1"/>
                    <ColorAnimation Storyboard.TargetName="stop3" Storyboard.TargetProperty="Color"
                       From="Blue" To="Red" Duration="0:0:1" BeginTime="0:0:0"/>
                    <ColorAnimation Storyboard.TargetName="stop3" Storyboard.TargetProperty="Color"
                       From="Red" To="Green" Duration="0:0:1" BeginTime="0:0:0.5"/>
                    <ColorAnimation Storyboard.TargetName="stop3" Storyboard.TargetProperty="Color"
                       From="Green" To="Blue" Duration="0:0:1" BeginTime="0:0:1"/>
                </Storyboard>
            </BeginStoryboard>
        </EventTrigger>
    </Rectangle.Triggers></Rectangle>
The above code initially creates a rectangle having a linear gradient of Red, Green, and Blue colors. Then it animates each gradient to change its color.
Following is the output of the above code:

Using the Code
I have created an application which displays an animated Indian flag. The full XAML code of the application is as follows:
 Collapse | Copy Code
<Window x:Class="AnimatedFlag.MainWindow"
        xmlns="http://schemas.microsoft.com/winfx/2006/xaml/presentation"
        xmlns:x="http://schemas.microsoft.com/winfx/2006/xaml"
        Title="Indian Flag" Height="350" Width="525">
    <Grid>
        <Image Name="flagImage" Margin="12">
            <Image.Triggers>
                <EventTrigger RoutedEvent="Window.Loaded">
                    <BeginStoryboard>
                        <Storyboard>
                            <DoubleAnimation Name="da" Storyboard.TargetName="flagImage"
                               Storyboard.TargetProperty="Width" From="200" To="200"
                               Duration="0:0:0.1" Completed="DoubleAnimation_Completed"/>
                        </Storyboard>
                    </BeginStoryboard>
                </EventTrigger>
            </Image.Triggers>
        </Image>
    </Grid></Window>
This code creates a dummy animation. I call it dummy animation because it does not actually change any property. The
<DoubleAnimation> element just uses the
Width property of the image but the values of the
From and
To attributes are the same (200). The
Duration attribute specifies the animation duration as 0.1 second. It uses the
Completed event handler to restart the animation after it is completed. The code-behind code is as follows:
 Collapse | Copy Code
public partial class MainWindow : Window
{
int ctr = 1;
public MainWindow()
{
InitializeComponent();
}
private void DoubleAnimation_Completed(object sender, EventArgs e)
{
ShowImage(); da.BeginAnimation(Image.WidthProperty, da); }
private void ShowImage()
{
string filename = "Images/Flag" + ctr + ".jpg";
BitmapImage image = new BitmapImage();
image.BeginInit();
image.UriSource = new Uri(filename, UriKind.Relative);
image.EndInit();
flagImage.Source = image;
ctr++;
if (ctr > 6)
{
ctr = 1; }
}
}
In the above code, the
DoubleAnimation_Completed event handler calls the
ShowImage() function to display six images in a sequence. It uses the
BeginAnimation() method of the
DoubleAnimation class to restart the animation. The first parameter of the
BeginAnimation method is
Image.WidthProperty which is a DependencyProperty. The second parameter is the
AnimationTimeline object.
The output of the program is as follows:


Points of Interest
I have created this application using Microsoft Visual C# 2010 Express Edition. I hope that this article will help in understanding the concepts of Storyboard and Animations in WPF.
Comments
Post a Comment